1. What is LED screen?
2. Why LED Display Not Working?
2.1 Hardware Components Issues
2.1.1 Testing the Receiving Card
2.1.2 Testing the Power Supply
2.1.3 Testing the LED module
2.2 Configuration File Issues
2.3 Connection File Issues
2.4 Flickering and Signal Instability
2.4.1 Driver Issues
2.4.2 Control system issue
2.4.3 Unstable Power Supply
2.4.4 System frequency issue
2.4.5 Graphics Card Settings
2.5 Environmental Factors
2.6 Aging Components
3. The Structure or Components of an LED Display
3.1 Components of A basic LED display
4. Issues of Each Component Not Working
4.1 LED module
4.1.1 Caterpillar
4.1.2 Dead LEDs
4.1.3 Localized Color Missing
4.1.4 Localized and Extensive Black Screen
4.1.5 Localized Garbled Display
4.2 Power supply
4.2.1 Cause Analysis
4.2.2 Emergency Measures
4.3 Control system
4.3.1 Receiving card
4.3.2 Controller
4.3.3 Control software-NovaLCT
5. Other troubleshooting phenomena and solutions
5.1 Bright and Dark Lines
5.2 Scan Lines/Moiré Patterns/Water Waves
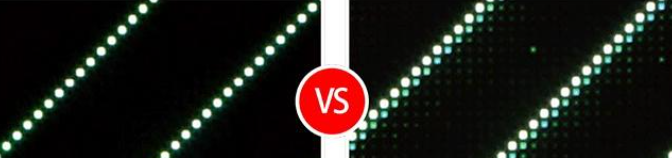
5.2.1 Scan Lines
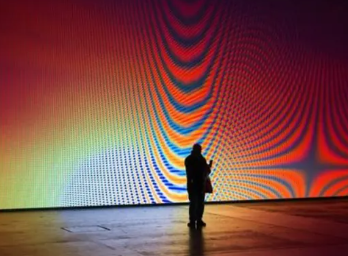
5.2.2 Water Waves
5.2.3 Moiré Patterns
5.3 Ghosting
5.4 Coupling
5.5 Color Distortion
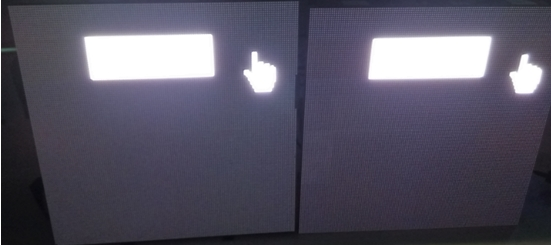
5.6 Uneven Brightness
1. What is LED screen?
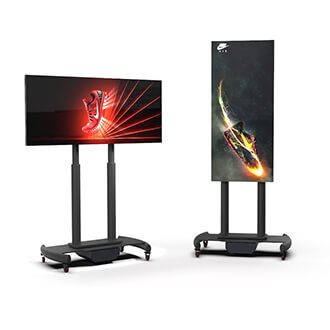
An LED screen is a display technology that uses light-emitting diodes (LEDs) to create vibrant images and videos. Known for their energy efficiency and high brightness, LED displays are widely used in applications such as billboards, digital signage, sports arenas, and concert venues, performing arts centers, studios, exhibitions, etc. Their ability to deliver clear visuals in bright environments and their versatility in size and shape make them popular for both indoor and outdoor use. With advancements in technology, modern LED displays can also offer features such as high refresh rates, wide viewing angles, and the capability to display dynamic content, enhancing visual experiences across various settings.
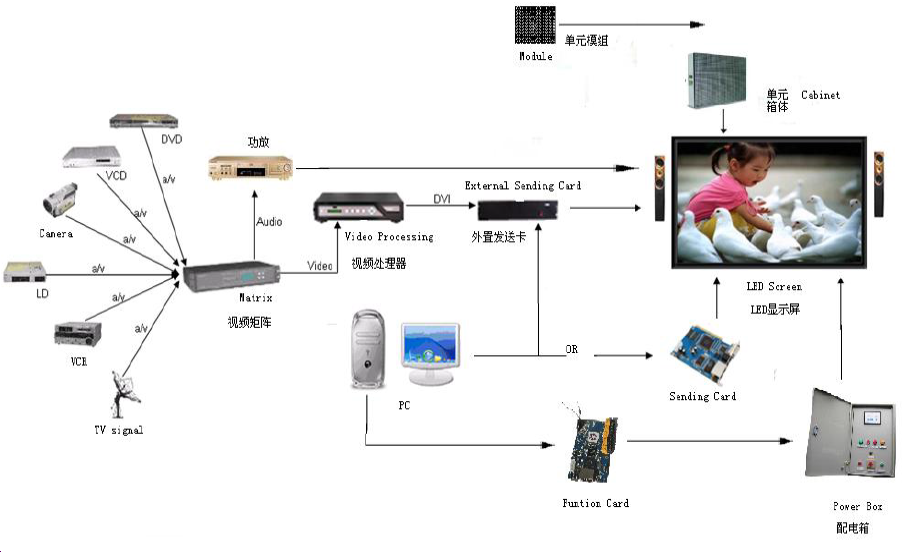
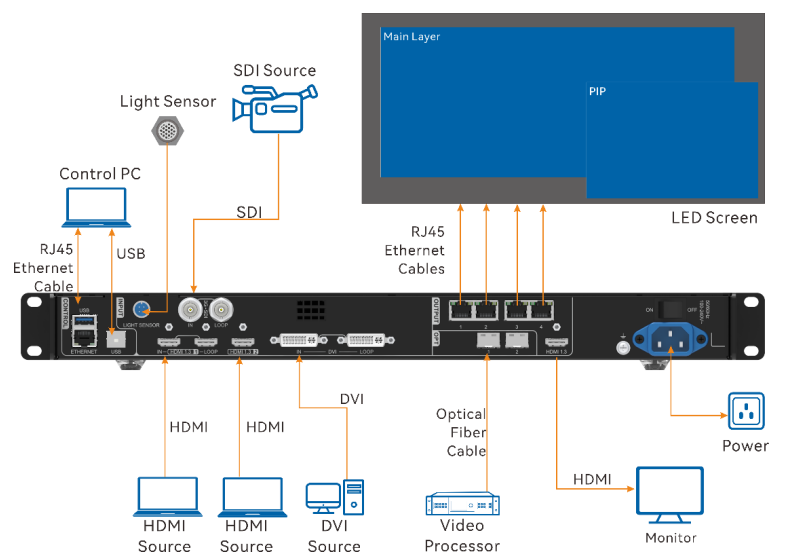
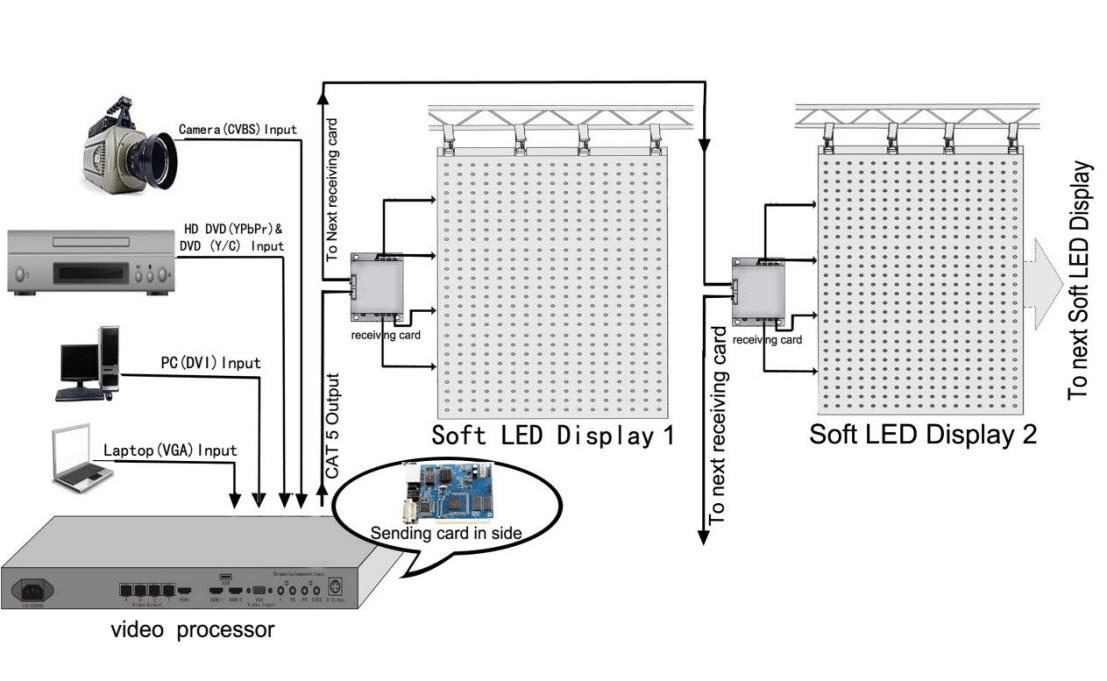
The LED display is typically composed of a sending card, a receiving card, a display driver circuit, and the LED modules. The sending card retrieves the brightness data for each pixel from the computer and then distributes it to several receiving cards. Each receiving card is responsible for controlling several rows (or columns) on the LED display.
2. Why LED Display Not Working?
-
Problems with the Cable, Power Supply, and Receiving Card
-
Problems with the Configuration File of the Receiving Card
-
Problems with the Screen Connection File of the Sending Box
2.1 Hardware Components Issues

If the screen connection file is fine but the display is black, the issue may lie with the cable, power supply, receiving card, or connection port. This can be assessed during the initial cabinet testing.
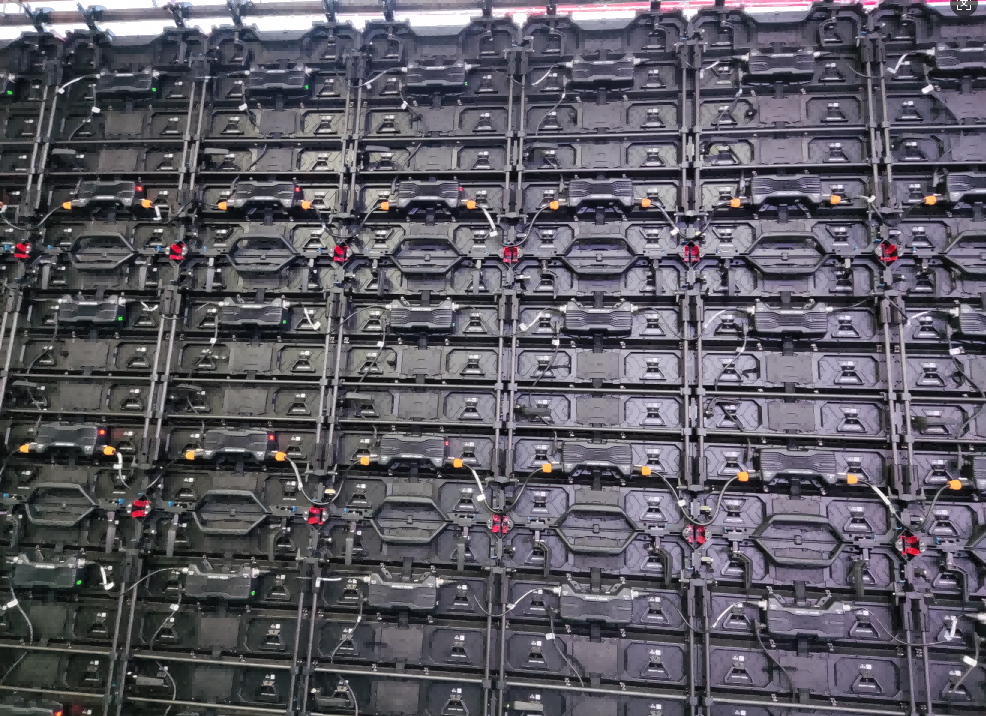
The display screen is primarily composed of three hardware components: the receiving card, the LED module, and the power supply. Understanding these components is crucial for diagnosing issues effectively.
2.1.1 Testing the Receiving Card
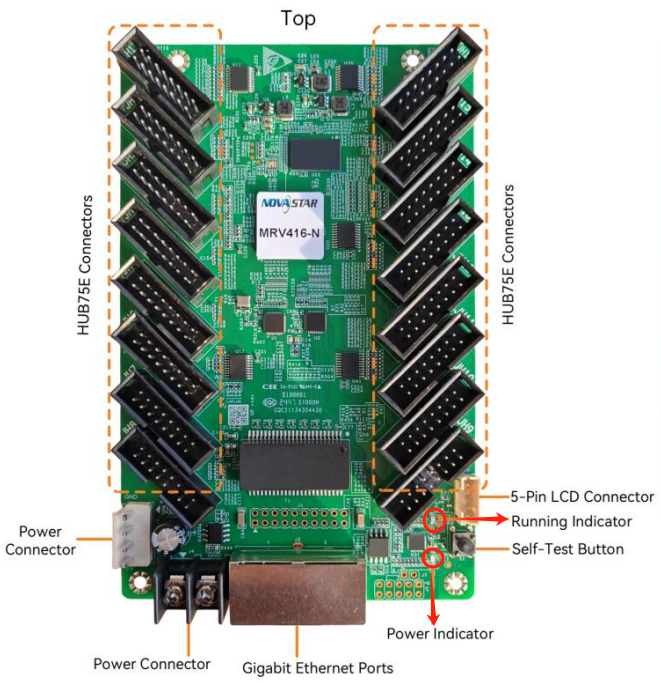
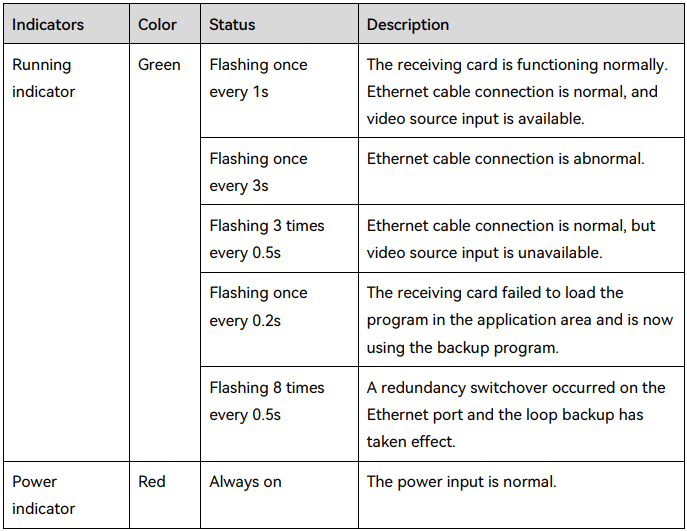
First, determine if the Receiving Card is functioning properly. After turning on the power, check if the indicator light is lit.
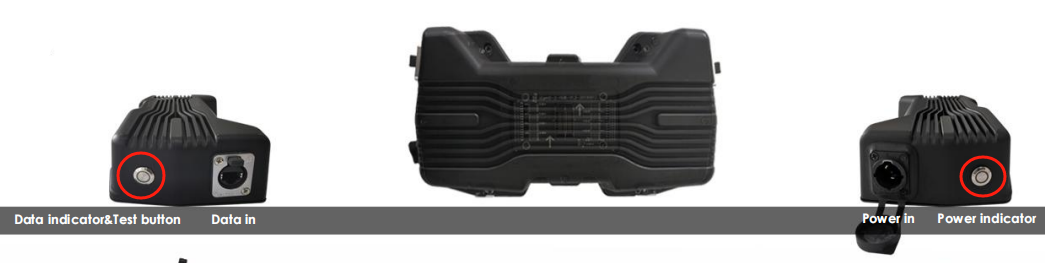
If it’s not lit, verify if there is a 5V power supply.
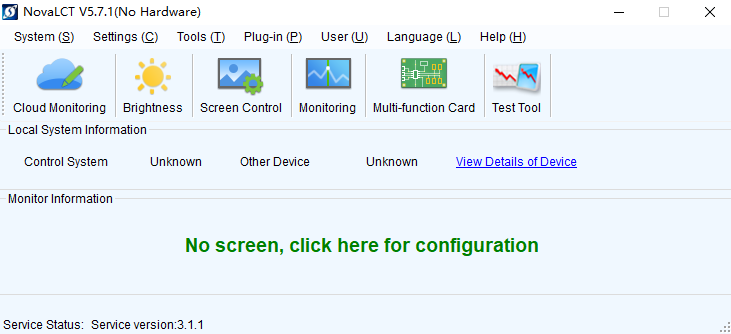
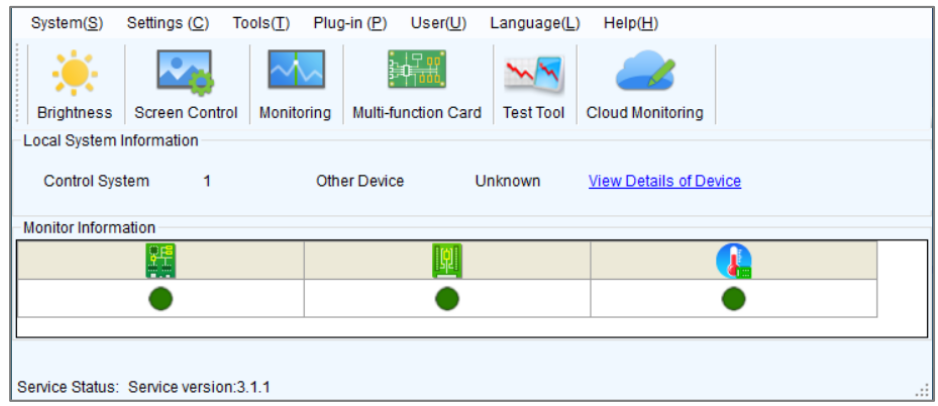
If the display screen can show content, the receiving card's display function is working correctly. Next, use the Configuration software“NovaLCT”  to search for the receiving card.
If it can be found, the sending function is normal; if not, check whether the Network cable is properly connected. (Signal green light should flash regularly 1s at a time)
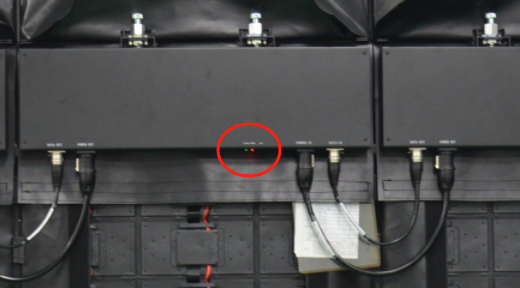
If the connection is good but the card cannot be found, the receiving card may be faulty. If both functions are working well, the receiving card is good; otherwise, it needs to be replaced.
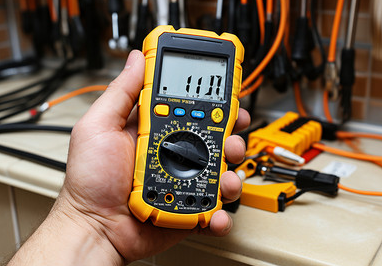
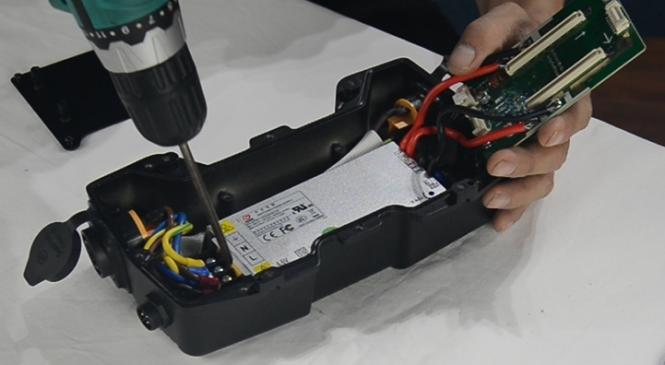
2.1.2 Testing the Power Supply
Next, assess the power supply. A faulty power supply can cause multiple boards to not light up or display abnormally, as a single power supply controls several LED Cabinets simultaneously. If multiple cabinets in the same area are not displaying or malfunctioning, consider that the power supply might be the issue. Use a multimeter to measure the output voltage, which should be between 4.9V and 5.5V. If it’s outside this range, the power supply needs to be replaced.
2.1.3 Testing the LED module
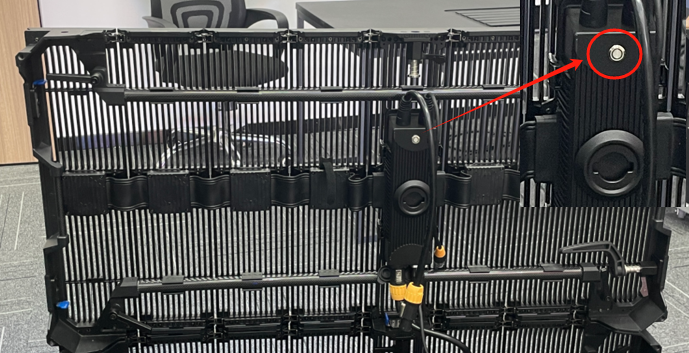
Then, evaluate the status of the LED module. The signal for the LED display is transmitted from the output pins of one LED module to the input of the next. If one of these fails, it can cause an entire row of LED modules to fail to light up or function abnormally.
To troubleshoot issues in a row of the display screen, Firstly, Identify the problematic module, check the first LED module in the row that is not functioning correctly.

If you suspect the module is defective, either replace it with a new one or use a long ribbon cable to bypass that module. After replacing or bypassing, check if the subsequent LED modules display normally to confirm whether the issue was isolated to the original module.
After finding the defective LED module, troubleshoot why this LED module not work. When the whole LED wall is bright, one or several rows are not bright, whether the circuit is broken or welded short circuit. If the whole LED wall does not light up, check whether the power and signal cables work well.
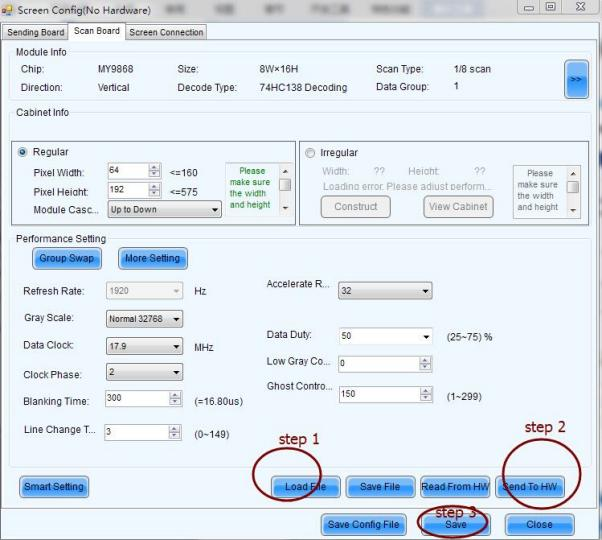
2.2 Configuration File Issues
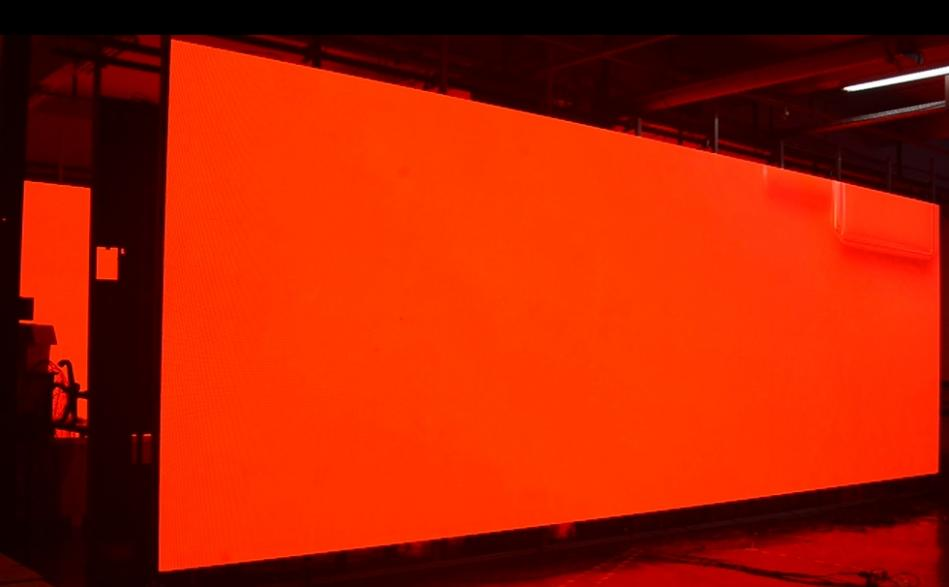
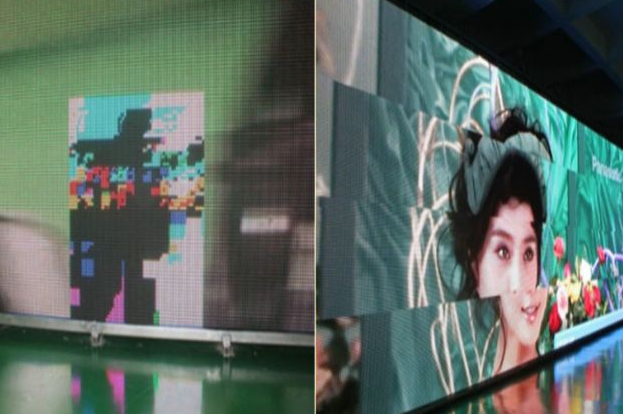
To determine whether the problem lies with the configuration file, connect the display screen to the power supply, disconnect the signal cable, and then press the test button.
The screen should do red, green, blue and white color testing. If the display is correct, the configuration file of the receiving card is fine. However, if the test screen appears irregular or distorted, there may be a problem with the configuration file.
Sometimes many clients mistakenly assume a configuration file issue when it’s not the case. You can use the sending card to read back the configuration file from the LED cabinets which has no problem and send it to other problematic cabinets to check firstly.
Or reload the correct configuration file (preferred, usually the supplier will send the file to client).
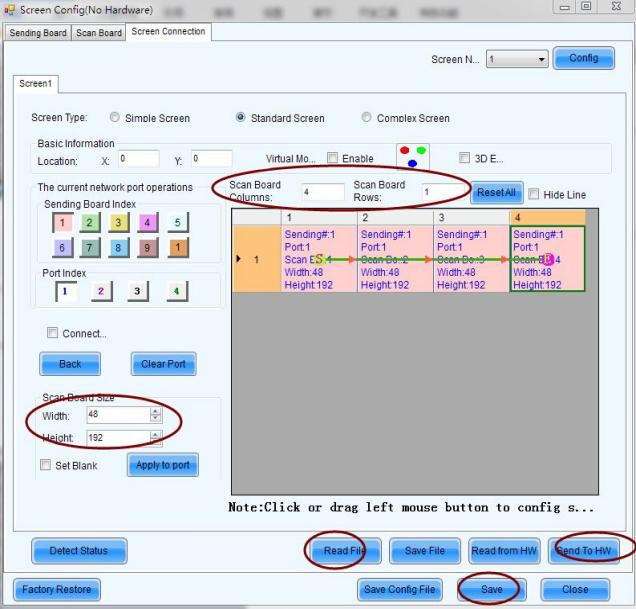
2.3 Connection File Issues
If the configuration file of the receiving card has been confirmed to be okay, but the screen still has display problems, the screen connection file of the controller may be defective and needs to be reset.
2.4 Flickering and Signal Instability
2.4.1 Driver Issues
If spots or distorted images appear across the screen, this is usually due to an incorrect driver loading program. Check the driver program and reinstall it if necessary.
2.4.2 Control system issue
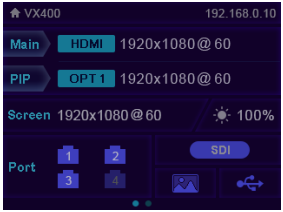
1. If the sending card is suspected to be defective, check that the resolution setting or replace
2. Check if the small lights on the receiving card are lit; if not, it may be defective.
2.4.4 Short Circuit in Connections
There may be a short circuit in the connection line between the power supply and the control card.
2.4.3 Unstable Power Supply:
The output voltage and current of the power supply may be unstable. Avoid connecting too many modules to the power supply that powers the control card.
2.4.4 System frequency issue
For irregular flickering, it may be a system frequency issue. Changing the system or adjusting the settings typically resolves this. If flickering appears as small dots, it could be related to graphics card driver issues or resolution settings of the sending card. Power supply issues (insufficient power, signal noise, electromagnetic interference) should also be considered. When designing the PCB, pay attention to the wire gauge for power and signal routing. Adding extra capacitors on the PCB can also help improve stability.
2.4.5 Graphics Card Settings
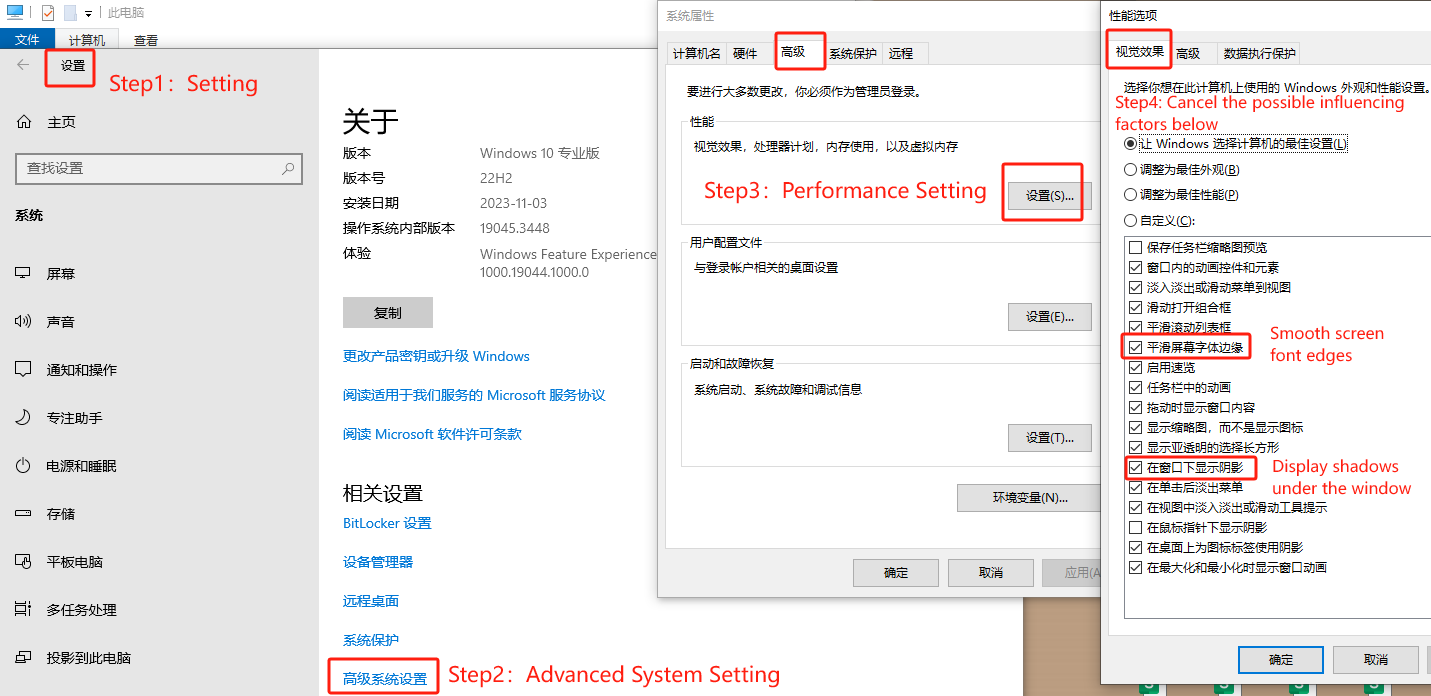
If flickering occurs with text (irregular white borders, flickering around text, or disappearance of text), this may be due to graphics card settings. Disabling options such as "Show menu drop shadow" and "Smooth edges of screen fonts" in display properties can resolve these issues.
2.5 Environmental Factors
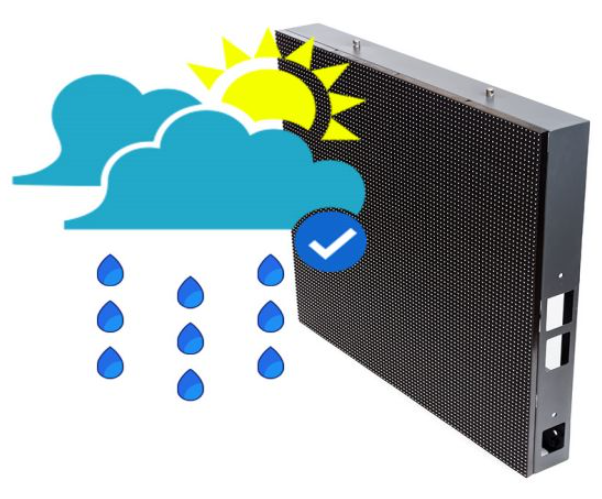
No matter the LED display is placed in outdoor or indoor, physical environment such as temperatures, humidity, and dirt accumulation can also affect the electronics within the display, leading to operational problems.
2.6 Aging Components
Over time, LED displays may experience degradation due to prolonged use. This includes the dimming of the display or dead pixels that can affect the overall viewing experience.

The above is an analysis of the common causes related to hardware or software issues of the LED display. Next, it is necessary for us to understand the structure of the LED display.
3.The Structure or Components of an LED Display
Before troubleshooting, it's crucial to understand the structure of an LED display, which consists of a control PC, a controller, and multiple LED cabinets containing modules and power supplies. Each component plays a vital role in ensuring the display functions correctly and delivers high-quality visuals.
3.1 Components of A basic LED display
An LED display is composed of several key elements:
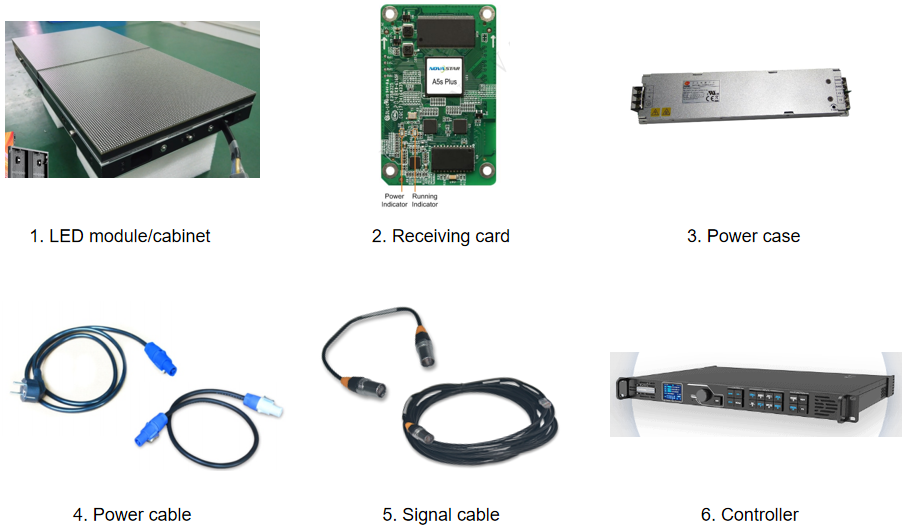
1.LED Module: Individual panels containing numerous LEDs that form the display surface.
2.Receiver Card: Distribute the data from the controller to the individual LED modules.
3.Power Supply: Provides the necessary electrical power to the LED cabinets and other components.
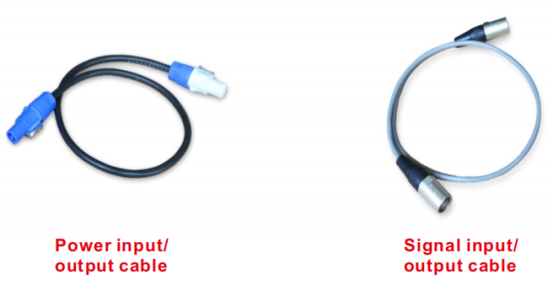
4/5. Connection Cable: Power cable provides electrical power to the entire display system; Signal Cables facilitate communication and data transfer.
6.Controller: Includes the control PC and controller, which manage content and signal transmission.
4. Issues of Each Component Not Working
4.1 LED module
4.1.1 Caterpillar
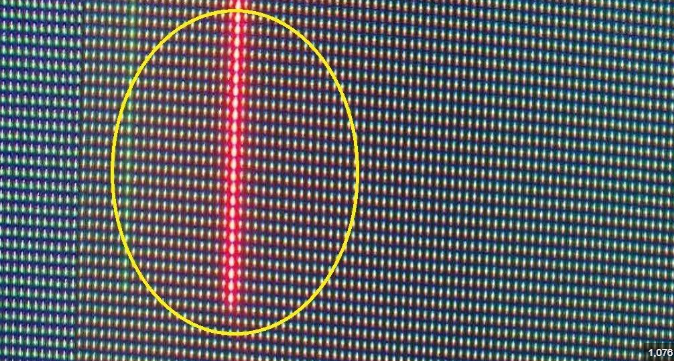
The term "caterpillar" refers to the phenomenon where some areas of an LED display show long strips of bright and dark lines, mainly in red, due to leakage current in the LED chips or short circuits in the IC lines, with leakage being more common.
To fix this, use a heat gun to apply warm air along the discolored strip, which often resolves the issue by breaking apart faulty connections. However, it's essential to locate and replace the defective LED chip. If the problem is due to a short circuit in the IC lines, use a multimeter to check the IC pin circuits and replace the faulty IC.
4.1.2 Dead LEDs
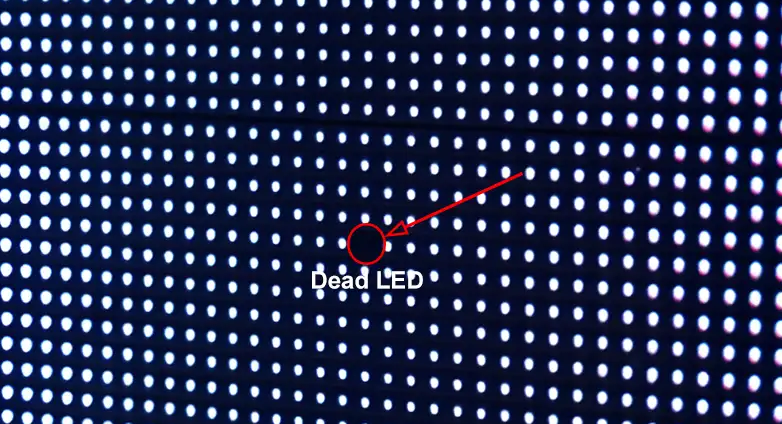
"Dead LEDs" refer to the phenomenon where one or more lights on an LED display do not illuminate. This issue can be categorized as either completely non-functional or partially non-functional in terms of color. Generally, this situation indicates a problem with the LED itself, which may be caused by moisture exposure or damage to the LEDs.
Replace the dead LEDs with a spare LEDs provided by the supplier. Using tweezers and a heat gun, after replacing the defective LED, we conduct a retest. If there are no issues, the repair is considered complete.
4.1.3 Localized Color Missing

This type of malfunction is relatively common, where a different color appears on the LED display while it is operating normally. This issue typically occurs because the IC controlling that specific color has burned out. The solution is to replace it with a new IC.
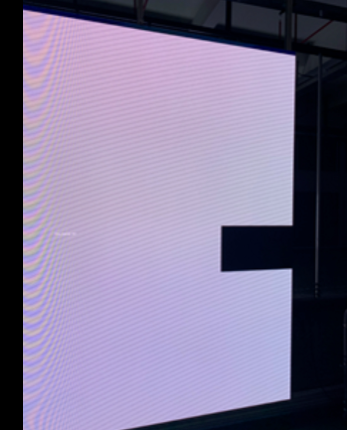
4.1.4 Localized and Extensive Black Screen
Refers to the phenomenon where one or more LED modules do not illuminate while the LED display is operating normally.
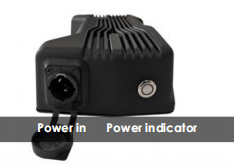
When this occurs, the first consideration is usually the power supply. Check whether the LED power supply indicator light is functioning properly.
If the LED power supply indicator is off, it is likely that the power supply is damaged, just replace a new one.
Additionally, inspect the power cables connected to the affected LED modules for any loose connections, tightening the cable connections.
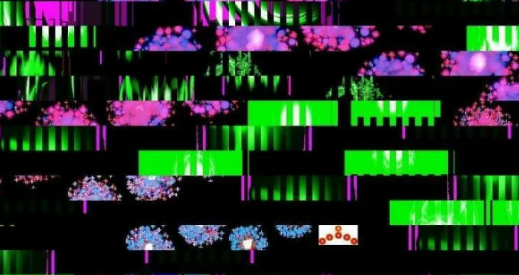
4.1.5 Localized Garbled Display
This type of fault is more complex, characterized by chaotic, irregular, and possibly randomly flickering on the LED display during playback.
To address this issue, start by checking the signal cable connections. Inspect the cables for any burn damage and ensure that signal cables are securely connected.
If the entire signal connection checks out fine, swap the problematic LED module with a neighboring functioning module. This can help determine whether the issue is due to a faulty LED module in the affected area. Damage is often related to the IC, and repairing it can be quite complex, so consulting a professional LED display repair technician is advisable.
4.2 Power supply
A stable power support ensures that LEDs do not flicker or display color deviations due to voltage or current fluctuations during operation. The efficiency of the power supply directly affects the energy consumption levels of the display. This is particularly important for large LED wall, which often require extended operating hours. Using an efficient power supply can significantly reduce operational costs. Additionally, the reliability of the power supply is a key factor influencing the long-term lifespan of LED displays.
Common power supply defects include: the power indicator light not illuminating, abnormal output voltage, and flickering or uneven brightness on the display.
4.2.1 Cause Analysis
· The power indicator light not illuminating may be due to loose or damaged power cables or a power supply failure.
· Abnormal output voltage could be caused by overload, overheating, overvoltage, or undervoltage.
· Flickering or uneven brightness on the display may result from an unstable power supply or damaged LEDs.
4.2.2 Emergency Measures
· First, check if the power cables are securely connected and if the power outlet is functioning properly.
· Next, verify that the power indicator light and output voltage are normal; if there are issues, the power supply should be replaced promptly.
· Finally, inspect the display and LEDs for any damage. If necessary, replace or repair components immediately. When addressing power supply issues, ensure that the power is turned off to avoid electric shock or equipment damage.
4.3 Control system
Control system includes sending card, receiving card, and control software. If there is a fault with the sending card or receiving card, it will result in the LED display being unable to receive and display signals correctly.
4.3.1 Receiving card
Here are some corresponding solutions for issues related to the receiving card:
4.3.1.1 Signal Loss:
· Check Power and signal connections: Ensure the power supply is connected and the power indicator light is on. Verify that the signal cables between the controller and receiving card are securely connected.
· Restart: Turn off the display, wait a few minutes, then turn it back on.
· Check Configuration: Ensure the settings for the receiving card and controller are correct; reset if necessary.
· Test Signal Source: Check if the input signal source is functioning properly; try a different device if possible.
· Examine Receiving Card: Ensure the receiving card is not damaged; remove and reseat it if needed.
4.3.1.2 Color Distortion:

Re-calibrate the display settings and color profiles in the control software.
Inspect the receiving card for damage and replace it if necessary.
4.3.1.3 Flickering Display:
Verify the power supply to the receiving card is stable.
Replace any damaged cables or connectors that may cause intermittent connections.
4.3.1.4 Partial Display Failure:
Test the receiving card by swapping it with a working one to identify if the card is defective.
Check for any loose connections or solder joints on the receiving card.
4.3.1.5 Communication Errors:
Update the control software to the latest version to ensure compatibility.
Confirm that the receiving card is properly configured in the software settings.
4.3.1.6 Overheating:

Ensure adequate ventilation around the receiving card.
Check for dust buildup and clean the card if necessary.
4.3.1.7 Power Issues:
Inspect the power supply unit for proper voltage and current output.
Replace the power supply if it is found to be inadequate or faulty..
4.3.2 Controller
4.3.2.1 Potential Faults Caused by the Sending Card


No Signal Transmission:
Check all connections between the controller and the control computer.
Verify that the control software is running correctly and configured properly.
Image Distortion:
Reboot the controller and check for any firmware updates.
Inspect the controller for physical damage and replace it if necessary.
Synchronization Issues:
Adjust the refresh rate settings in the control software to match the display's specifications.
Ensure that the signal cables are secure and undamaged.
Communication Errors:
Reinstall or update the control software to the latest version.
Check for compatibility issues between the sending card and the software
Overheating:
Ensure proper ventilation around the sending card and clean any dust buildup.
Monitor the operating temperature and consider using cooling solutions if overheating persists.
Power Supply Problems:
Inspect the power supply for proper voltage and current levels.
Replace the power supply if it is found to be faulty or inadequate.
4.3.3 Control software-NovaLCT
4.3.3.1 Potential Faults Caused by Control Software
Hardware Not Recognized:
Check all connections to ensure the sending and receiving cards are properly installed and connected.
Updte the control software to the latest version to ensure compatibility.
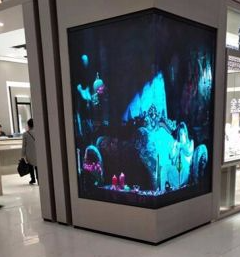
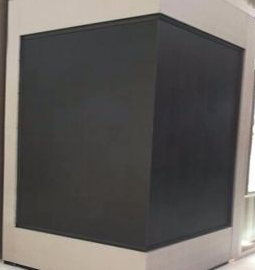
Image Delay
Optimize network settings to ensure stable data transmission speeds.
Check computer performance to ensure it meets the system requirements for running the software.

Color Inaccuracy
Recalibrate display settings to ensure accurate color configuration.
Verify the quality and standards of the source image files.


Crashes or Freezes:
Regularly save work progress to avoid data loss.
Restart the software or computer to resolve temporary issues.
Configuration Errors:
Review and adjust display settings to ensure resolution and refresh rate match the display specifications.
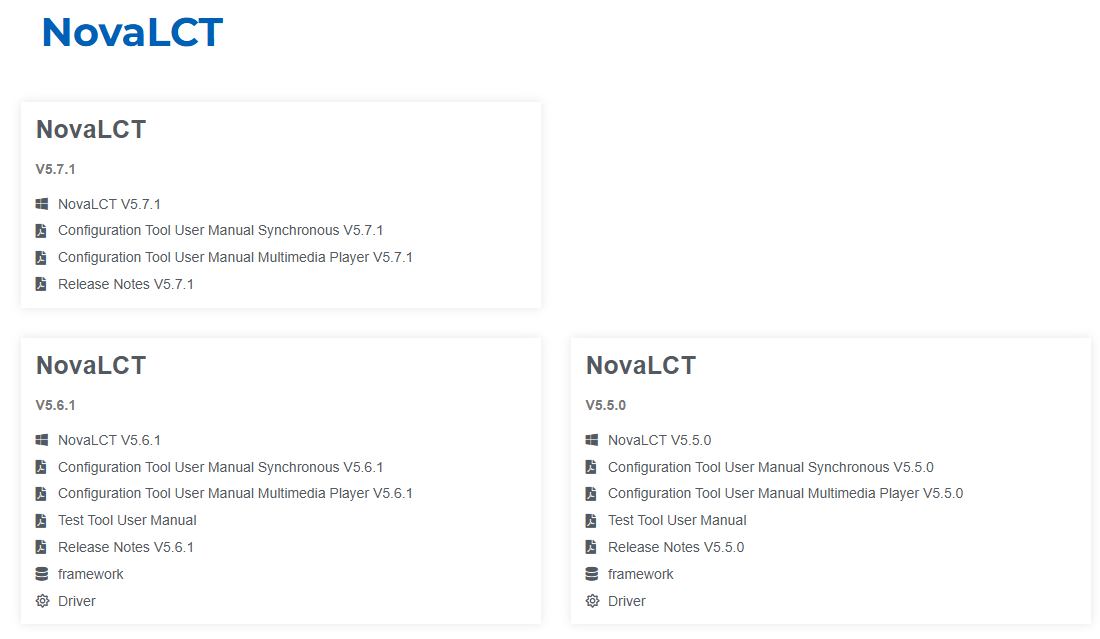
Refer to the user manual or online documentation at the links below to ensure all configurations are correct.
https://www.novastar.tech/downloads/?_sasdk=dMTkxZDllZTg5NmY0YjgtMDQ1NThiNDViZGQ3MWZjLTI2MDAxMTUxLTEyOTYwMDAtMTkxZDllZTg5NzA0NmE
Data Transmission Errors:
Check the network connection to ensure a stable signal.
Try retransmitting data or using alternative methods to ensure data integrity.
By implementing these solutions, you can effectively address faults caused by the control system, ensuring the LED display operates smoothly. Regular maintenance and troubleshooting can help prevent issues and enhance the overall performance of the display. If any problems arise, following these steps will facilitate quick resolution, allowing for continuous and reliable operation of the LED display.
5. Other troubleshooting phenomena and solutions
5.1 Bright and Dark Lines
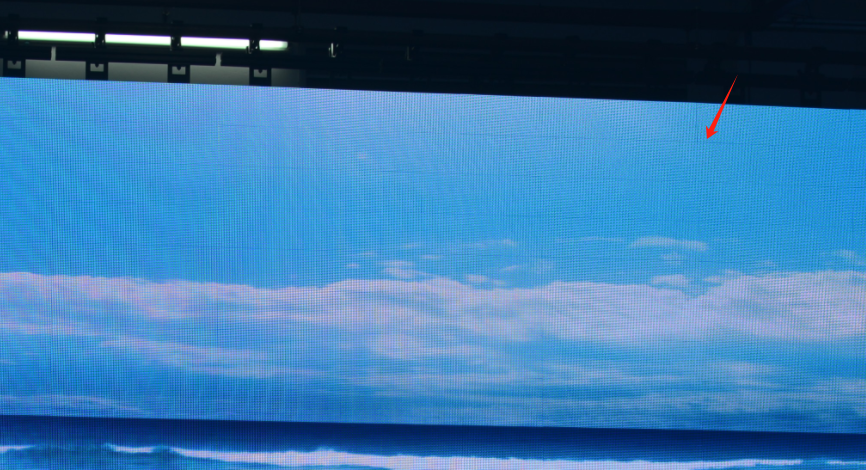
· Phenomenon: Noticeable bright or dark stripes appear on the screen.
· Causes: This is often due to unstable power supply, signal interference, or poor connections between LED modules. It may also indicate issues with the controller.
· Solutions:
o Check and stabilize the power supply.
o Inspect and secure all connections to ensure they are tight.
o Replace any faulty components as needed.
5.2 Scan Lines/Moiré Patterns/Water Waves
5.2.1 Scan Lines

· Causes: Typically caused by instability in the refresh rate of the display.
· Solutions:
o Adjust Refresh Rate: Ensure the refresh rate of the LED display is set correctly to minimize scan lines.
o Check Signal Quality: Ensure that the signal being sent to the display is stable and free from interference.
5.2.2 Water Waves

· Causes: Typically caused by signal interference or issues with the refresh rate.
· Solutions:
o Check Signal Quality: Ensure that all connections and cables are high quality and free of interference.
o Adjust Refresh Rate: Optimize the refresh rate settings to reduce the appearance of water waves.
5.2.3 Moiré Patterns
· Causes: Occurs due to interference between the display's pixel arrangement and visual shown.
· Solutions:
o Change Display Settings: Adjust the resolution and scaling settings to minimize interference.
o Use Anti-Aliasing Techniques: Implement digital filtering or anti-aliasing in the display settings to smooth out content.
5.3 Ghosting
· Causes: Blurry images or shadows around image edges on the screen, are typically caused by slow display response times, signal interference, inadequate image processing algorithms, or graphics card settings.
· Solutions:
o Check and optimize the display settings, including refresh rates.
o Ensure that the graphics card drivers are up to date.
o Consider using a display with a faster response time.
5.4 Coupling
· Causes: Signal interference occurs between different LED modules, this usually due to poor routing of power and signal cables, inadequate grounding of the display, or electromagnetic interference .
· Solutions:
o Ensure proper separation of power and signal track in the PCB design.
o Improve grounding techniques to minimize interference.
o Use shielded cables to reduce electromagnetic interference.
5.5 Color Distortion

· Causes: The displayed colors do not match expectations, resulting in color imbalances or inconsistencies, which can be caused by aging LEDs, improper color calibration, or incorrect driver settings
· Solutions:
o Recalibrate the color settings of the display.
o Replace aging LED modules as necessary.
o Ensure that the drivers are correctly configured.
5.6 Uneven Brightness

· Causes: Noticeable differences in brightness between different modules can result from aging modules, insufficient power supply, or poor calibration.
· Solutions:
o Regularly maintain and calibrate the display.
o Check the power supply to ensure it can adequately support all LED modules.
o Replace or adjust the module that shows a significant difference in brightness.
Understanding these phenomena, their causes, and solutions can help in troubleshooting and maintaining LED displays effectively.
We are a leading manufacturer specializing in research, development, manufacturing, and sales of intelligent LED display screens. We have a research and development production base located in Foshan, as well as a sales center in Shenzhen.
As a national high-tech enterprise with over 50 patents, we are proud to have been awarded multiple Red Dot design awards for our products, includes intelligent LED display screens, flexible LED display screens, and creative display screens ,which have been exported to various parts of the world and we have maintained long-term partnerships with clients in over 50 countries and regions worldwide.
Look forward to something better with us!
www.huasuny.com
Tel : +86-757-81266190
E-mail : info@huasuny.com
Skype : huasuny.com